Jenkins
CONTINUOUS INTEGRATION:
It is the combination of continuous build and continuous test
CONTINUOUS INTEGRATION = CONTINUOUS BUILD + CONTINUOUS TEST
CI SERVER:
Here Build, Test & Deploy all these activities are performed in a single CI server
CONTINUOUS INTEGRATION:
Whenever a developer commits the code using source code management like GIT, then the CI pipeline gets the changes of the code runs automatically build and unit test.
- Due to integrating the new code with old code, we can easily get to know the code is a success or failure.
- It finds the errors more quickly
- Delivery the products to client more frequently
- Developers don't need to manual tasks
- Reduces the developers time 20% to 30%
CI/CD PIPELINE:
It looks like Software Development Life Cycle, but let's see how it works.
Lets consider an example, if you are developing a web application
Version Control: Here developers need to write code for web applications. So it needs to be committed using version control system like GIT or SVN.
Build: Lets consider your code is written in java, it needs to be compiled before execution. In this build step code gets compiled.
Unit Test: If the build step is completed, then move to testing phase in this step unit step will be done.
Deploy: If the test step is completed, then move to Deploy phase in this step you can deploy your code in testing environment. Here you can see your application output.
Auto Test: Once our code is working fine in testing servers, then we need to do Automation testing using Selenium or Junit.
Deploy to Production: If everything is fine then you can directly deploy your code in production server.
NOTE: If we have error in Code then it will give feedback and it will be corrected, if we have error in Build then it will give feedback and it will be corrected, Pipeline will work like this until it reaches Deploy.
Because of this pipeline, Bugs will be reported fast and get rectified so entire development is fast.
JENKINS:
Jenkins is an open source project written in java by Kohsuke Kawaguchi it runs on the Window, Linux and Mac OS
It is community-supported, Free to use, and the First choice for Continuous Integration.
- Consist of Plugins
- Automates the Entire Software Development Life Cycle (SDLC).
- It was originally developed by Sun Microsystem in 2004 as HUDSON.
- Hudson was an enterprise Edition we need to pay for it.
- The project was renamed Jenkins when Oracle brought the Microsystems.
- It can run on any major platform without Compatibility issues.
- Whenever developers write code, we integrate all the code of all developers at any point in time and we build, test, and deliver/deploy it to the client. This is called CI/CD.
Advantages:
- Jenkins follows Master-Slave Architecture.
- You can write your own plugin, can use the community plugin also.
- Can understand the process of what is going on.
- Jenkins master is going to assign a job to the slave..
- If Slaves are not available Jenkins itself does the job.
- By using the labels we can specify the jobs to the nodes.
JENKINS ALTERNATIVES:
JENKINS SETUP:
- Go to jenkins.io and copy the links
- sudo wget -O /etc/yum.repos.d/jenkins.repo https://pkg.jenkins.io/redhat-stable/jenkins.repo
- sudo rpm --import https://pkg.jenkins.io/redhat-stable/jenkins.io.key
- Install EPEL (Extra Package for Enterprise Linux)
- sudo amazon-linux-extras install epel -y
- Install JAVA
- yum install java-openjdk11 -y
- Install git, maven & Jenkins
- yum install git jenkins maven -y
- Restart Jenkins
- systemctl start jenkins
- Check Jenkins server is running or not:
- systemctl status jenkins
- Connect to dashboard: copy the public IP address of the server and make a paste on the new tab with Jenkins port number (8080)
- public_ip:8080
- To unlock the jenkins:
- cat /var/lib/jenkins/secrets/initialAdminPassword
- Install suggested plugins
- Add user name, Password and mail id
- connect to dashboard
JOB: To perform some set of tasks we use a job in Jenkins.
PARAMETER TYPES:
- String: any combination of characters and numbers
- Choice: a pre-defined set of strings from which a user can pick a value
- Credentials: a pre-defined Jenkins credential
- File: the full path to a file on the filesystem
- Multi-line String: same as String, but allows newline characters
- Password: similar to the Credentials type, but allows us to pass a plain text parameter specific to the job or pipeline
- Run: an absolute URL to a single run of another job
This is used when we want to build our local files.
General — > This Project is Parameterized — > Fille Parameter
CHOICE PARAMETER:
This parameter is used when we have multiple options to generate a build but need to use only on specific one.
General — > This Project is Parameterized — > Choice Parameter
STRING PARAMETER:
This parameter is used when we need to pass an parameter as input by default.
It can be any combination of characters and numbers.
General — > This Project is Parameterized — > String Parameter
MULTI STRING PARAMETER:
This will work as same as String Parameter but the difference is instead of one single line string we can use multiple strings at a time as a Parametres.
General — > This Project is Parameterized — > Multi-String Parameter
LINKED JOBS :
This is used when a job is linked with another job
TYPES: Up stream and Down stream
Here for job-1 both job-2 & job-3 are Downstream
For job-2 upstream is job-1 and Downstream is job-3
for Job-3 Both Job-2 & job-1 are Upstream
MASTER & SLAVE:
SETUP:
sudo yum update -y
sudo wget -O /etc/yum.repos.d/jenkins.repo https://pkg.jenkins.io/redhat-stable/jenkins.repo
sudo rpm --import https://pkg.jenkins.io/redhat-stable/jenkins.io.key
sudo amazon-linux-extras install jenkins -y
sudo systemctl restart jenkins
sudo systemctl status jenkins
copy the IPV4 and paste it on browser like {ipv4:8080}
sudo cat /var/lib/jenkins/secrets/initialAdminPassword
sudo vim /etc/passwd
sudo passwd jenkins
sudo visudo
sudo vim /etc/ssh/sshd_config
sudo systemctl restart sshd
sudo systemctl status sshd
LOGIN TO SLAVE
sudo useradd jenkins
sudo passwd jenkins
sudo visudo
sudo vim /etc/ssh/sshd_config
sudo systemctl restart sshd
sudo systemctl status sshd
LOGIN TO MASTER
sudo su jenkins
ssh-keygen
ssh-copy-id jenkins@localhost
yes
exit
ssh-copy-id jenkins@public IPV4 of slave
ssh jenkins@public IPV4 of Slave
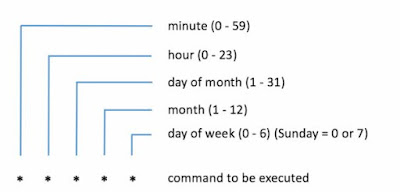
CRON JOB: We can schedule the jobs that need to be run at a particular intervals.
Build Triggers -- > Build periodically -- > * * * * * -- > save
If you want to make it customize then we can use cron syntax generator.
POLL SCM: This is used when we want to build after developer pushes the code for regular interval
WEBHOOKS: If developer changes the code then it will build at that point of time.
Go to the github and select the repo
select settings -- > webhooks -- > create a webhook
Payload url : jenkinsurl/github-webhook/
Content type: Application.json
Now change the code in repo you will get a new build.
environment variables:
BUILD — > SHELL SCRIPT
name=raham
location=hyd
echo "HAI, MY NAME IS ${name} IAM FROM ${location}”
SELECT TO SEE LIST OF ALL ENVIRONMENT VARIABLES
echo "BUILD ID IS ${BUILD_ID}"
echo "JOB NAME IS ${JOB_NAME}”
echo “${GLOBAL_VAR}" : THIS WONT WORK WE NEED TO SET IT MANUALLY
MANAGE JENKINS — >CONFIGURE SYSTEM — > GLOBAL PROPERTIES — > ENVIRONMENT NAME — >
NAME: GLOBAL_VAR & VALUE: ABCD — > SAVE
NOW IT WILL PRINT THE GLOBAL VAR OUTPUT
APPLY THESE TO PARAMETERISED BUILDS
echo "${GLOBAL_VAR}"
echo "BUILD ID IS ${BUILD_ID}"
echo "JOB NAME IS ${SERVER}"
echo "DEPLOYED TO ${DEPLOY}"
echo "YOUR PASSWORD IS ${yourPasswordPara}"
echo "IM PRINTING ${multiLineStringParam}"
echo "THIS IS FILE ${FILEPATH}”
timeout:
BUILD ENVIRONMENT — > ABORT THE BUILD IF IT STUCK — > ABSOLUTE: 3 — > EXECUTE SHELL
SLEEP 240 (BUILD WILL TAKE 240 SECONDS) — > SAVE
AFTER 4 MINUTES IT WILL ABORT AUTOMATICALLY
IF YOU WANT TO MAKE IT AS FAIL CHECK TIME-OUT ACTIONS BELOW.
time stamp:
echo "HAI ALL GOOD EVENING"
sleep 10
echo "WELCOME TO MY CLASS”
TO CHECK IT ENABLE TIMESTAMP BUILD ENVIRONMENT
CONCURRENT OR PARALLEL JOBS :
IF YOU WANT TO RUN PARALLEL BUILDS
GENERAL — > RUN PARALLEL BUILDS IF REQUIRED
throttle build:
IF YOU WANT TO RUN A SPECIFIC JOB FOR SPECIFIC TIMES IN A PERIOD OF TIME
NUMBER OF BUILDS: 4 TIME PERIOD: MINUTES
THAT MEANS ON A MINUTE MAXIMUM YOU CAN DO 4 BUILDS ONLY
YOU CAN SEE THE APPROXIMATE TIME BELOW THE NUMBER OF BUILDS
custom workspace:
THIS IS USED WHEN WE WANT TO CREATE OUR OWN CUSTOM WORK SPACE
GENERAL — > ADVANCED — > USE CUSTOM WORKSPACE — > PATH — > /tmp/test
NOW WE CREATED A TEST DIRECTORY UNDER /TMP
GIVE EXECUTE SHELL COMMAND (echo “HAI RAHAM” >> abc.txt)
NOW YOU WILL SEE abc.txt IN TEST DIRECTORY UNDER /tmp
rename a job:
IF YOU WANT TO RENAME A BUILD THEN
GENERAL — > ADVANCE — >DISPLAY NAME — > SAVE
create a pipeline through build pipeline:
PLUGINS — > BUILD PIPELINE — > INSTALL
CREATE TWO JOBS AND CONFIGURE EXECUTE SHELL FOR BOTH JOBS
JOB1-BUILD: { sleep 10 & echo “THIS IS BUILDING”}
JOB2-TEST: { sleep 10 & echo “THIS IS DEPLOYING TO TEST ENVIRONMENT”}
JOB1-BUILD — > CONFIGURE — > POST BUILD ACTION — > BUILD OTHER PROJECT — > JOB2-TEST
CLICK ON + SYMBOL ON DASH BOARD — > BUILD PIPELINE VIEW — > NAME — > CREATE
SELECT INITIAL JOB (JOB-1)— > OK & APPLY
JENKINS AGENT SETUP:
LAUNCH 2 INSTANCES (MASTER & SLAVE) WITH PEM FILE.
JENKINS SETUP IN MASTER
INSTALL JAVA-OPENJDK11 IN SLAVE
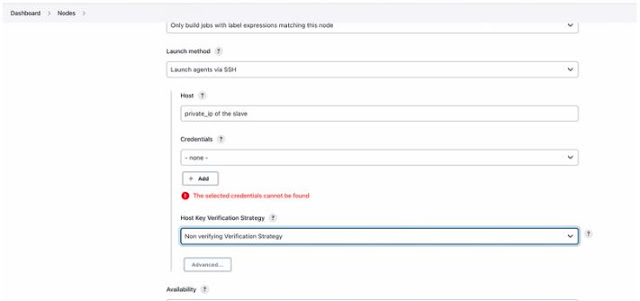
GO TO JENKINS DASHBOARD--> MANAGE JENKINS --> SETUP AGENT --> give node name and select permanent agent and create.
Add jenkins credentials
Kind: SSH username with private key
Username: ec2-user
Private key: pem file copy paste
save & add node
pipelines:
Jenkins Pipeline is a combination of plugins that supports integration and implementation of continuous delivery pipelines.
A Pipeline is a group of events interlinked with each other in a sequence.
There are two types of Jenkins pipeline syntax used for defining your JenkinsFile
- Declarative
- Scripted
ALWAYS : WILL PRINT EVEN IF IT FAILS OR SUCCESS
FAILURE : WILL PRINT WHEN BUILD GOT FAILED
SUCCESS: WILL PRINT WHEN BUILD GOT SUCCESS
DO WITH THIS BY REMOVING 12 IN ECHO12


