Docker
- It is old method.
- If we use multiple guest OS then the performance of the system is low.
- Container is nothing but, it is a virtual machine which does not have any OS.
- Docker is used to create these containers.
- It is an open source centralized platform designed to create, deploy and run applications.
- Docker is written in the Go language.
- Docker uses containers on host O.S to run applications. It allows applications to use the same Linux kernel as a system on the host computer, rather than creating a whole virtual O.S.
- We can install Docker on any O.S but the docker engine runs natively on Linux distribution.
- Docker performs O.S level Virtualization also known as Containerization.
- Before Docker many users face problems that a particular code is running in the developer’s system but not in the user system.
- It was initially released in March 2013, and developed by Solomon Hykes and Sebastian Pahl.
- Docker is a set of platform-as-a-service that use O.S level Virtualization, where as VM ware uses Hardware level Virtualization.
- Container have O.S files but its negligible in size compared to original files of that O.S.
docker client:
It is the primary way that many Docker users interact with Docker. When you use commands such as docker run, the client sends these commands to docker daemon, which carries them out. The docker command uses the Docker API.
docker host:
Docker host is the machine where you installed the docker engine.
docker daemon:
Docker daemon runs on the host operating system. It is responsible for running containers to manage docker services. Docker daemon communicates with other daemons. It offers various Docker objects such as images, containers, networking, and storage.
docker registry:
A Docker registry is a scalable open-source storage and distribution system for docker images.
POINTS TO BE FOLLOWED:
You cant use docker directly, you need to start/restart first (observe the docker version before and after restart) You need a base image for creating a Container. You cant enter directly to Container, you need to start first. If you run an image, By default one container will create.
basic docker commands:
docker RENAME:
To rename docker container: Docker rename old_container new_container To rename docker port: stop the container go to path (var/lib/docker/container/container_id) open hostconfig.json edit port number restart docker and start container
docker EXPORT:
It is used to save the docker container to a tar file Create a file which contains will gets stored: touch docker/password/secrets/file1.txt TO EXPORT: docker export -o docker/password/secrets/file1.txt container_name SYNTAX: docker export -o path container
- docker run --name cont1 -d nginx
- docker inspect cont1
- curl container_private_ip:80
- docker run --name cont2 -d -p 8081(hostport):80(container port) nginx
- syntax - docker exec cont_name command
- ex-1: docker exec cont1 ls
- ex-2: docker exec cont mkdir devops
- to enter into container: docker exec -it cont_name /bin/bash
- First it should have a base image - docker run nginx
- Now create a container from that image - docker run -it --name container_name image_name /bin/bash
- Now start and attach the container
- go to tmp folder and create some files (if you want to see the what changes has made in that image - docker diff container_name)
- exit from the container
- now create a new image from the container - docker commit container_name new_image_name
- Now see the images list - docker images
- Now create a container using the new image
- start and attach that new container
- see the files in tmp folder that you created in first container.
- It is basically a text file which contains some set of instructions.
- Automation of Docker image creation.
- Always D is capital letters on Docker file.
- And Start Components also be Capital letter.
- First you need to create a Docker file
- Build it
- Create a container using the image
FROM: ubuntu
RUN: touch aws devops linux
FROM: ubuntu
RUN: touch aws devops linux
RUN echo "hello world">/tmp/file1
TO BUILD: docker build -t image_name . (. represents current directory)
Now see the image and create a new container using this image. Go to container and see the files that you created.
- When we create a Container then Volume will be created.
- Volume is simply a directory inside our container.
- First, we have to declare the directory Volume and then share Volume.
- Even if we stop the container still, we can access the volume.
- You can declare directory as a volume only while creating container.
- We can’t create volume from existing container.
- You can share one volume across many number of Containers.
- Volume will not be included when you update an image.
- If Container-1 volume is shared to Container-2 the changes made by Container-2 will be also available in the Container-1.
- You can map Volume in two ways:
- Container < ------ > Container
- Host < ------- > Container
- Decoupling Container from storage.
- Share Volume among different Containers.
- Attach Volume to Containers.
- On deleting Container Volume will not be deleted.
- Create a Docker file and write
FROM ubuntu
VOLUME["/myvolume"]
- build it - docker build -t image_name .
- Run it - docker run -it - -name container1 ubuntu /bin/bash
- Now do ls and you will see myvolume-1 add some files there
- Now share volume with another Container - docker run -it - -name container2(new) - -privileged=true - -volumes-from container1 ubuntu
- Now after creating container2, my volume1 is visible
- Whatever you do in volume1 in container1 can see in another container
- touch /myvolume1/samplefile1 and exit from container2.
- docker start container1
- docker attach container1
- ls/volume1 and you will see your samplefile1
- docker run -it - -name container3 -v /volume2 ubuntu /bin/bash
- now do ls and cd volume2.
- Now create one file and exit.
- Now create one more container, and share Volume2 - docker run-it - -name container4 - - -privileged=true - -volumes-from container3 ubuntu
- Now you are inside container and do ls, you can see the Volume2
- Now create one file inside this volume and check in container3, you can see that file
- Verify files in /home/ec2-use
- docker run -it - -name hostcont -v /home/ec2-user:/raham - -privileged=true ubuntu
- cd raham [raham is (container-name)]
- Do ls now you can see all files of host machine.
- Touch file1 and exit. Check in ec2-machine you can see that file.
- docker volume ls
- docker volume create <volume-name>
- docker volume rm <volume-name>
- docker volume prune (it will remove all unused docker volumes).
- docker volume inspect <volume-name>
- docker container inspect <container-name>
- To attach a volume to a container: docker run -it --name=example1 --mount source=vol1,destination=/vol1 ubuntu
- To send some files from local to container:
- create some files
- docker run -it --name cont_name -v "$(pwd)":/my-volume ubuntu
- To remove the volume: docker volume rm volume_name
- To remove all unused volumes: docker volume prune
- create a volume : docker volume create volume99(volume-name)
- mount it: docker run -it -v volume99:/my-volume --name container1 ubuntu
- now go to my-volume and create some files over there and exit from container
- mount it: docker run -it -v volume99:/my-volume-01 --name container2 ubuntu
- Select an image that includes docker and S.G SSH and HTTP enable anywhere on it.
- docker run -it ubuntu /bin/bash
- Create some files inside the container and create an image from that container by using - docker commit container-name image1
- now create a docker hub account
- Go to ec2-user and log in by using docker login.
- Enter username and password.
- Now give the tag to your image, without tagging we can’t push our image to docker.
- docker tag image1 rahamshaik/new-image-name (ex: project1)
- docker push rahamshaik/project1
- Now you can see this image in the docker hub account.
- Now create one instance in another region and pull the image from the hub.
- docker pull rahamshaik/project1
- docker run -it - -name mycontainer rahamshaik/project1 /bin/bash
- Now give ls and cd tmp and ls you can see the files you created.
- Now go to docker hub and select your image -- > settings -- > make it private.
- Now run docker pull rahamshaik/project1
- If it is denied then login again and run it.
- If you want to delete image settings -- > project1 -- > delete
- Login to docker hub
- search for Jenkins then you will get Jenkins official image.
- copy the code : docker pull jenkinsci/jenkins:lts
- run this code in docker engine
- now see docker images then you will get jenkins image
- create container using that image
- Now exit from the container and start the container again
- Inspect the container : docker inspect jenkins
- now go to jenkins image in docker hub and scroll down you will get command
- Docker swarm is an orchestration service within docker that allows us to manage and handle multiple containers at the same time.
- It is a group of servers that runs the docker application.
- It is used to manage the containers on multiple servers.
- This can be implemented by the cluster.
- The activities of the cluster are controlled by a swarm manager, and machines that have joined the cluster is called swarm worker.
To create a service: docker service create —name devops —replicas 2 image_name
Note: image should be present on all the servers
To update the image service: docker service update —image image_name service_name
Note: we can change image,
To rollback the service: docker service rollback service_name
To scale: docker service scale service_name=3
To check the history: docker service logs
To check the containers: docker service ps service_name
To inspect: docker service inspect service_name
To remove: docker service rm service_name
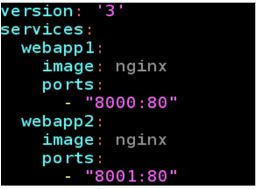
- It is a tool used to build, run and ship the multiple containers for application.
- It is used to create multiple containers in a single host.
- It used YAML file to manage multi containers as a single service.
- The Compose file provides a way to document and configure all of the application’s service dependencies (databases, queues, caches, web service APIs, etc).
- version - specifies the version of the Compose file.
- services - it the services in your application.
- networks - you can define the networking set-up of your application.
- volumes - you can define the volumes used by your application.
- configs - configs lets you add external configuration to your containers. Keeping configurations external will make your containers more generic.
docker-compose up -d - used to run the docker file
docker-compose build - used to build the images
docker-compose down - remove the containers
docker-compose config - used to show the configurations of the compose file
docker-compose images - used to show the images of the file
docker-compose stop - stop the containers
docker-compose logs - used to show the log details of the file
docker-compose pause - to pause the containers
docker-compose unpause - to unpause the containers
docker-compose ps - to see the containers of the compose file
DOCKER STACK:
It is used when you want to launch the whole software together.
You will write all the services and launch them together.
docker stack deploy -c demo.yml demostack
demo.yml = name of file & demostack = name of stack
now see the services by using docker service ls all of the services are running
docker service scale id=no.of_replicas : To scale the services
docker service ps stackname : To see the the services running
DOCKER INTEGRATION with Jenkins
- Install docker and Jenkins in a server.
- vim /lib/systemd/system/docker.service
- Replace the above line with
- ExecStart=/usr/bin/dockerd -H tcp://0.0.0.0:4243 -H unix:///var/run/docker.sock
- systemctl daemon-reload
- service docker restart
- curl http://localhost:4243/version
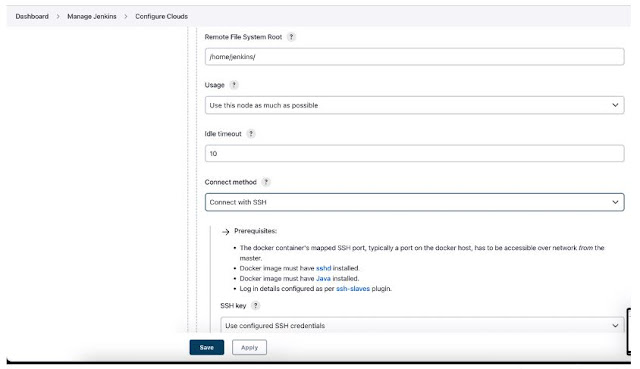
- Install Docker plugin in Jenkins Dashboard.
- Go to manage jenkins>Manage Nodes & Clouds>>Configure Cloud.
- Add a new cloud >> Docker
- Name: Docker
- add Docker cloud details.
Add Docker Agent Template
- Save it and do and watch the container in Jenkins dashboard.
- Manage Jenkins>>Docker (last option)
Deployment docker file:
Create 2 files:
- Dockerfile
- index.html file
Dockerfile consists of
FROM ubuntu
RUN apt-get update
RUN apt-get install apache2 -y
COPY index.html /var/www/html/
CMD ["/usr/sbin/apachectl", "-D", "FOREGROUND"]
Index.html file consists of
<h1>hi this is my web app</h1>
Add these files into GitHub and Integrate with Jenkins by declarative code pipeline.
pipeline {
agent any
stages {
stage ("git") {
steps {
git branch: 'main', url: 'https://github.com/devops0014/dockabnc.git'
}
}
stage ("build") {
steps {
sh 'docker build -t image77 .'
}
}
stage ("container") {
steps {
sh 'docker run -dit -p 8077:80 image77'
}
}
}
}
You will get Permission Denied error while building the code.
To resolve that error you need to follow these steps:
- usermod -aG docker jenkins
- usermod -aG root jenkins
- chmod 777 /var/run/docker.sock
Now you can build the code and it will gets deployed.
docker directory data:
We use docker to run the images and create the containers. but what if the memory is full in instance. we have a add a another volume to the instance and mount it to the docker engine.
Lets see how we do this.
- Uninstall the docker - yum remove docker -y
- remove all the files - rm -rf /var/lib/docker/*
- create a volume in same AZ & attach it to the instance
- to check it is attached or not - fdisk -l
- to format it - fdisk /dev/xvdf --> n p 1 enter enter w
- set a path - vi /etc/fstab (/dev/xvsf1 /var/lib/docker/ ext4 defaults 0 0)
- mount -a
- install docker - yum install docker -y && systemctl restart docker
- now you can see - ls /var/lib/docker
- df -h
- it is a container organizer, designed to make tasks easier, whether they are clustered or not.
- abel to connect multiple clusters, access the containers, migrate stacks between clusters
- it is not a testing environment mainly used for production routines in large companies.
- Portainer consists of two elements, the Portainer Server and the Portainer Agent.
- Both elements run as lightweight Docker containers on a Docker engine
- Must have swarm mode and all ports enable with docker engine
- curl -L https://downloads.portainer.io/ce2-16/portainer-agent-stack.yml -o portainer-agent-stack.yml
- docker stack deploy -c portainer-agent-stack.yml portainer
- docker ps
- public-ip of swamr master:9000


